From the desk of David Utke
Subj: Launch a WordPress website on a totally free web host
So you want to create a website with WordPress but you don’t want to pay for hosting. Well this tutorial is for you then.
I’m going to show you how to set up a fully functional WordPress-powered website for completely free — no credit card required, no hidden fees, no ads on your site.
We’ll be using InfinityFree as our web host, NameCheap to register a custom domain name, and then install WordPress with everything properly configured and optimized.
Here’s exactly what we’ll cover:
- Signing up for InfinityFree
- Touring the account dashboard
- Registering a custom domain name at NameCheap
- Adding your custom domain to your hosting account
- Issuing a free SSL certificate
- Installing WordPress
- Optimizing your WordPress installation
- Installing essential plugins
Let’s get into it.
Namecheap
Low prices on domain names, low renewal rates, free WHOIS protection and good support.
I use Namecheap for all my domains and use them in my tutorial videos.

What is InfinityFree and this free hosting plan?
InfinityFree is a traditional web host that offers a completely free hosting plan.
You get access to cPanel, file manager, and Softaculous so you can install scripts like WordPress with a one-click installer.
Here’s what you get on the free plan:
- 5 GB of disk space
- Unlimited bandwidth
- PHP 8.3
- Free subdomains
- Ability to add a custom domain name
- Free DNS service
- Full .htaccess support
- File manager access
- Free SSL certificates
This is enough resources to launch a WordPress site that gets around 150 daily visitors max.
The biggest overall differentiator for InfinityFree is that they give you access to cPanel on a free hosting account, which is rare as free Apache server style hosts are becoming more rare today as it is.
For more, checkout my guide on the best free webhosts.
Step 1: Sign Up for InfinityFree
Head over to infinityfree.com. When you’re ready to get started, click on the Sign Up Now button (or the Register Now button at the top).
You’ll see a simple form:
- Enter your email address
- Set a password and confirm it
- Click to register
After submitting the form, InfinityFree will send a verification link to the email address you used. Go to your inbox, find the email, and click the verify button.
Once you do that, you’re logged in and your account is created.
Step 2: Create Your Hosting Account
Once you’re inside the InfinityFree dashboard, you’ll be under Hosting Accounts.
Click Create Account and select the InfinityFree Forever (free) plan. Click Create Now.
You’ll be prompted to confirm you’re human — go ahead and do that.
Set a Primary Domain Name
Every hosting account needs a primary domain name.
At this stage, InfinityFree will ask you to pick a subdomain. Don’t stress over this, it really doesn’t matter what you pick here because we’re going to add a custom domain name and use that for your website
Just type in something simple and click Check Availability.
Once it’s available, you’ll move to the additional information screen:
- Your account label and username are generated automatically
- Set your account password (save this somewhere safe)
- Choose your email preferences
Click Create Your Account obviously.
InfinityFree will show a setup page and it may say it could take up to 72 hours for full DNS propagation, but in practice your account will be ready to use in a matter of minutes.
Your Dashboard
Once the account is set up, click Hosting Accounts to get back to your main dashboard. You’ll see your active account listed. Note that you can have up to 3 active hosting accounts on a free plan.
To manage your account, click the Manage button. From this dashboard, you have quick access to:
- Website Builder (powered by site.pro)
- Script Installer (Softaculous — this is how we’ll install WordPress)
- File Manager (useful for verifying ownership with Google Search Console, AdSense, etc.)
- Control Panel (cPanel — your back-end hosting control center)
Step 3: Register a Custom Domain Name at NameCheap
Before we go any further with InfinityFree, we need a custom domain name to add to our hosting account. I personally use and recommend NameCheap.
They have great prices, low renewal rates and solid support.

How to Register Your Domain
- Go to namecheap.com
- Type the domain name you want in the search bar
- Click the red search button
- If it’s available, you’ll see it listed — if not, try a different word combination
Tip: If this is your first website, I strongly recommend getting a .com extension. It’s the most recognizable and trusted TLD.
When you find an available .com you like, click Add to Cart, then click Checkout.
On the checkout page:
- You can register for up to 10 years in advance. This is worth considering if you’re committed to the name
- Domain Privacy Protection is included for free and this is quite important because registering a domain requires you to submit your name, address, and email. Domain privacy keeps all that personal information hidden from public WHOIS lookups
Click Confirm Order, create or log into your NameCheap account, review your order, and submit payment.
Done!
Step 4: Add Your Custom Domain to InfinityFree
Now that you’ve registered your domain, it’s time to connect it to your InfinityFree hosting account.
Adding the Domain
- Go back to your InfinityFree hosting dashboard and click Add Domain
- When asked what type of domain to add, select Add Custom Domain (not another free subdomain)
- Type in the domain name you just registered (e.g.,
yourdomain.com) - For the directory option, keep it as New Directory which this means your domain gets its own file manager and installation files, rather than mirroring the subdomain (which you don’t want)
- Click Add Domain
Now it will tell you to verify ownership over the domain.
The best way to do exactly that is through updating your nameservers ad Namecheap. Don’t worry, it’s a simple “copy & paste” job that can be done in less than a minute.
Pointing Your Name Servers to InfinityFree
After clicking Add Domain, InfinityFree will show you a Name Server Validation screen. This is where you tell NameCheap to point your domain to InfinityFree’s servers.
The name servers you need are:
ns1.infinityfree.com
ns2.infinityfree.com
Here’s how to update them in NameCheap:

- Go to NameCheap and navigate to your domain
- Click Manage
- Scroll down to find Nameservers
- Switch to Custom DNS
- Enter
ns1.infinityfree.comandns2.infinityfree.com - Click the green checkmark to save
NameCheap will confirm that the DNS server update may take up to 48 hours to fully propagate. It normally does not take this long but please be patient.
After Propagation
Once you’ve saved your name servers in NameCheap, go back to InfinityFree and click Add Domain.
You may see a warning that says the DNS settings were verified but the hosting server can’t confirm yet, this is totally normal and just means propagation is still in progress.
Be patient here. I can’t stress this enough.
In my tutorial I had to wait about 12 hours before I could add the domain.
Give it a few hours, and go through the same Add Domain → Add Custom Domain process again.
Once propagation is complete, you’ll get a green checkmark and your domain will appear under your Domains tab.
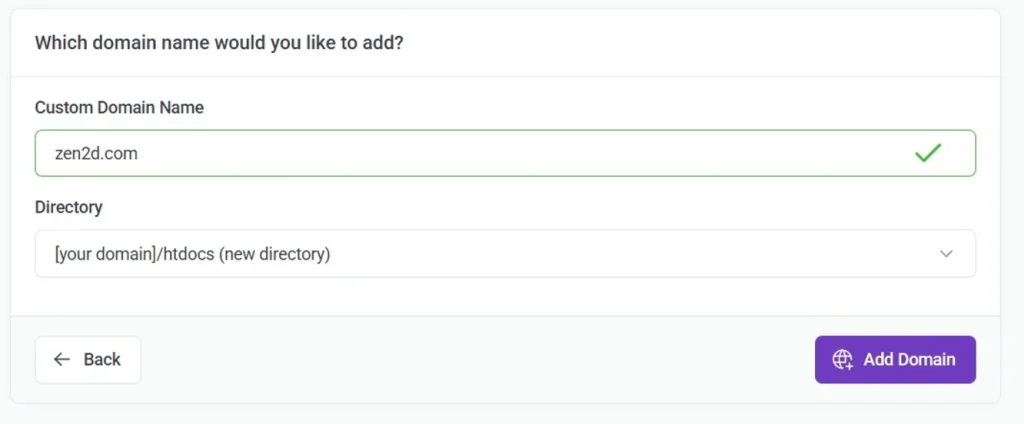
Now you’re ready to rock and roll.
Step 5: Issue a Free SSL Certificate
Before installing WordPress, there’s one more important step: issuing an SSL certificate for your domain. The SSL is what gives your site the https:// prefix and the padlock icon in browsers.
It’s essential for trust, SEO, and security.
With InfinityFree, this process is actually pretty straightforward and easy.
Ordering the Certificate
- From your hosting account dashboard, click SSL Certificates in the main menu
- Click New SSL Certificate
- Type in your domain name
- You can click Advanced Options to see certificate providers (Let’s Encrypt and Google Trust are available) — I recommend leaving it on the recommended provider
- Click Create Order
Installing the CNAME Record
After the order is created, InfinityFree will show you a CNAME record that needs to be installed. You don’t need to go back to NameCheap for this. InfinityFree handles it internally, all you have to do is click on the purple install button.
Here’s what to do:
- Click the CNAME Record Setup button
- It may look like nothing happened, that’s normal, it’s just a quirk of the platform
- To verify it worked, go back to your account, navigate to your custom domain, then open Control Panel (cPanel)
- Scroll down in cPanel and find CNAME Records then click on it
- You should see the CNAME record listed there and that confirms it was added correctly
Requesting the Certificate
Almost done, now you need to request the certificate.
- Navigate back to SSL Certificates by clicking in the top menu item
- Click Manage next to your domain
- You should see a message: “The CNAME record is set up correctly.”
- Click Request Certificate. InfinityFree will begin processing it
- Once done, move to Step 4 on that page: Install the SSL Certificate
- Click Install SSL Certificate Automatically
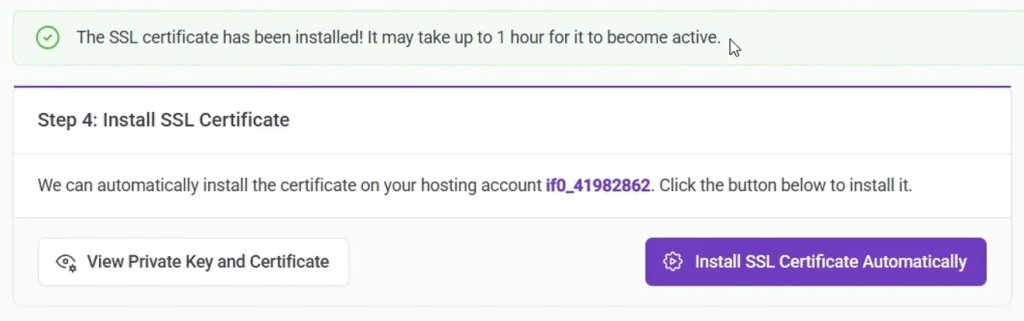
You’ll see a confirmation that the SSL certificate has been installed.
It may take up to one hour to become active.
Again, I recommend waiting 1–2 hours before proceeding to install WordPress.
Step 6: Install WordPress
Now the fun part. You have a custom domain, it’s pointing to InfinityFree, and you have an SSL certificate.
It’s finally time to install WordPress and design our website!
Running the Installer
- From your hosting account dashboard, click on your custom domain name
- Click the Script Installer button — this opens Softaculous
- Find WordPress in the list and click Install
Configuring the Installation
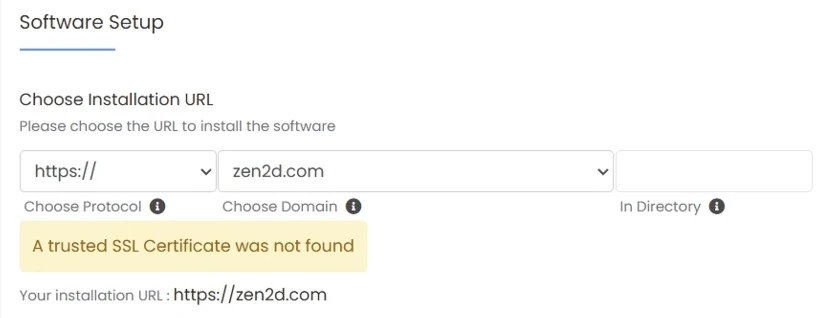
Scroll down to the Software Setup section:
- Installation URL: Change the dropdown from your subdomain to your custom domain name. Make sure the directory field is empty (you want WordPress installed at the root, not in a subfolder like
/WP) - You may see a warning about a trusted SSL certificate not being found, ignore this. Once WordPress is installed, the certificate will work properly, trust me.
Next, scroll to the Admin Account section:
- Set your admin username (avoid using “admin” as it’s a common target for brute force attacks)
- Set a strong admin password
- Enter your admin email address
Finally, scroll to the Select Plugin section.
By default, Softaculous may pre-check some plugins to install. I personally uncheck all of these, we’ll install our own carefully chosen plugins later.
When you’re ready, click Install.
Logging Into Your New WordPress Site
Once Softaculous finishes, you’ll see: “Congratulations. The software was installed successfully.”
Visit your domain in a browser and you should see your WordPress website, complete with a custom domain name and HTTPS (the padlock icon confirms your SSL is working).
To log in to the WordPress admin dashboard, go to:
yourdomain.com/wp-adminEnter the admin username (or email) and password you set during installation.
Welcome to WordPress.
Step 7: Optimize Your WordPress Installation
Update WordPress.
After logging in, WordPress will likely notify you that an update is available. Go ahead and click Please Update Now, then click Update to the Latest Version.
You may also be prompted to update your WordPress database as well, just click through and continue.
Keeping WordPress updated is important for security and performance.
Install a Theme

The look and feel of your WordPress site is controlled by themes. To change or explore themes:
- Go to Appearance → Themes in the dashboard sidebar
- You’ll see the currently installed themes — click Activate on any of them to switch
- To explore new themes, click Add Theme
The WordPress theme directory has thousands of free options. You can browse by Popular, Latest, or use the Feature Filter to narrow by layout type (blog, e-commerce, portfolio, etc.).
Once you find a theme you like, click Install then Activate.
Pro tip: Once you’ve settled on a theme, delete the other inactive themes from your installation. Having extra themes sitting unused is unnecessary weight. Go to each inactive theme, click on it, and click Delete.
I also suggest choosing a lightweight theme for this free host. Frameworks like Elementor are resource heavy.
Configure Permalinks
This is one of the most important settings to configure early and one that many beginners overlook.
Go to Settings → Permalinks.
This controls the URL structure of your website.
By default, WordPress uses Day and Name, which adds dates to every URL (e.g., /2024/01/15/your-post-name/). Dates in URLs are terrible for most websites as they’re not optimal for SEO unless you’re creating time sensitive content.
I recommend switching to Post Name as it gives you clean, descriptive URLs like yourdomain.com/your-post-name/. That’s what I use here on the website you’re on now.
While you’re here, you can also update your Category Base.
By default, categories appear as /category/category-name/. I personally change the base to topics so it reads as /topics/category-name/ as to me this just feels cleaner.
You can change the Tag Base too, or leave it blank if you don’t use tags (I personally only use one tag on my site, and that’s for the “most popular” content).
Click Save Changes when done.
Configure Your User Profile
Go to Users → All Users, then click on your account.
A few things worth setting up here:
- Change your password: Under Account Management, you can set a new password at any time
- Profile picture: This is tied to Gravatar — a service by WordPress that links an avatar image to your email address. Set one up there and it’ll appear across WordPress sites
- Biographical Info: Many themes display an author bio at the bottom of blog posts — fill this in if you want that to appear
- Display Name: You can set a nickname and choose how your name is displayed publicly (e.g., show “David” instead of your username)
Click Update Profile when done.
Step 8: Install Essential Plugins
With InfinityFree’s free plan, your resources are somewhat limited so you want your WordPress site to be lean, fast, and efficient.
I recommend three specific plugins to accomplish this.
First: Delete Default Plugins
Before adding anything, clean house. Go to Plugins → Installed Plugins. By default, you’ll see Akismet and Hello Dolly installed.
Delete both of these, they’re not needed for what we’re building.
Plugin 1: RankMath (SEO)
RankMath is a powerful, free SEO plugin that helps you optimize your on-page SEO, manage your meta titles and descriptions, monitor 404 errors, and handle redirects.
- Go to Plugins → Add New Plugin
- Search for
RankMath - Click Install Now, then Activate
RankMath will launch an onboarding wizard — you can skip it for now and come back later. You can create a free RankMath account to unlock some additional features, but it’s not required.
From the RankMath dashboard, I recommend enabling two modules:
- 404 Monitor — tracks any URLs on your site that return a “page not found” error. Useful for catching broken internal links or outdated external links
- Redirections — lets you create 301 redirects if you ever change a post’s URL. If you rename a page, you point the old URL to the new one — no broken links, no lost SEO value
When you’re writing a blog post, RankMath appears as a small button in the top-right of the editor. Click it to access the Snippet Editor, where you can set the SEO title, permalink, and meta description for each post.
RankMath also gives you a score and checklist. You don’t need to get everything green, but it’s a helpful guide.
Plugin 2: Smush (Image Optimization)
Images are one of the biggest performance killers on websites — especially on a free hosting account where resources are limited. Smush automatically compresses and optimizes every image you upload to WordPress.
- Search for
Smushin Plugins → Add New Plugin - Install and activate it
Smush has a startup wizard, feel free to skip it. From the Smush dashboard, you can click Optimize Images to compress everything already in your media library.
Do this periodically as you add new content.
One feature I particularly like is Lazy Loading. Enable this from the Smush dashboard.
What it does: images that are below the fold (i.e., not immediately visible when someone lands on your page) won’t load until the visitor scrolls down to them. This makes your pages feel faster on the initial load because the browser isn’t downloading images the visitor hasn’t even reached yet.
You can choose how those images appear as they load — fade in, spinner, placeholder, etc.
Plugin 3: WP Super Cache (Caching)
A caching plugin speeds up your website by serving pre-generated static files to visitors instead of rebuilding the page from scratch on every visit. It uses significantly fewer server resources, which matters on a free hosting plan.
I recommend WP Super Cache for InfinityFree. It’s made by the team behind WordPress itself, it’s lightweight, and it works well with Apache servers (which InfinityFree uses).
- Search for
WP Super Cachein Plugins → Add New Plugin - Install and activate it
- Go to Settings → WP Super Cache
- Under the Easy tab, select Caching On (Recommended)
- Click Update Status
That’s it, caching is now enabled.
If you want to explore advanced settings, they’re available under the Advanced tab, but I’d recommend leaving everything at the default settings unless you have a specific reason to change something.
Note: You may see a prompt inside WP Super Cache recommending Jetpack Boost. I’d ignore that and keep things simple with WP Super Cache as your caching solution.
Summary: Your Three Must-Have Plugins
To recap, here are the three plugin categories I recommend for any WordPress site on InfinityFree:
| Plugin | Category | Purpose |
|---|---|---|
| RankMath | SEO | On-page SEO, redirects, 404 monitoring |
| Smush | Image Optimization | Compress images, enable lazy loading |
| WP Super Cache | Caching | Speed up page load times |
If you decide you prefer different plugins in any of these categories, that’s completely fine, just make sure you have one plugin per category.
Don’t stack multiple caching plugins or multiple SEO plugins on top of each other.
You’re Done! Here’s What You Built
Let’s take stock of what you’ve accomplished:
✅ A free hosting account with InfinityFree
✅ A custom domain name registered through NameCheap
✅ Name servers pointed from NameCheap to InfinityFree
✅ A free SSL certificate (HTTPS) installed on your domain
✅ WordPress installed at the root of your domain
✅ WordPress updated to the latest version
✅ A theme installed and inactive themes deleted
✅ Permalinks configured to use Post Name structure
✅ User profile set up
✅ Three essential plugins installed (SEO, image optimization, caching)
You now have a fully functional, WordPress-powered website running on a custom domain with HTTPS all without paying for hosting!
Please be patient with DNS propagation. When you update name servers or add a domain, it can take anywhere from a few hours to 48 hours to fully propagate.
Yes, it’s annoying but you have no choice but to wait.
Last, make sre to keep everything update like WordPress core, themes, and plugins to stay secure.
Any questions?
Drop me an email or DM.
PS: Oh and don’t forget to register your custom domain name at Namecheap.
How I can help you. You're here, let's do this:
1. Website Review Your website may be clear and specific to you, but it may be really confusing to anyone who visits. That's where I come it, I'll give you actionalbe feedback to improve your site with my highly rated gig.2. My YouTube channel Helpful video tutorials showing you how to launch, grow and monetize your audience.