Nothing says “pro” like ThanitaBunny87 at gmail. Look, if you’re going to be growing an monetizing an audience you need a professional business email.
Something like hello at your website.com. It builds trust with your audience and makes brands comfortable doing business with you.
There are three ways to do this:
- Create an email inbox using your shared hosting account.
- Setup a redirect with your shared host so you can use Gmail.
- Purchase dedicated email hosting (super cheap!)
Let’s get to it.
Setup a pro email with a shared hosting account
By far, the easiest method is to use your web hosting account. If you’re doing anything online, you need a website so get a shared hosting account.
With any shared hosting account, (I’ll be using Bluehost as they are the most popular shared host recommended by WordPress) you can create a few different inboxes for your domain.
Step 1: Create an inbox with CPanel email
First log into your hosting account. Depending on your web host, you’ll need to navigate to where you can manage email.
For Bluehost, CPanel email is under the hosting tab with your websites.
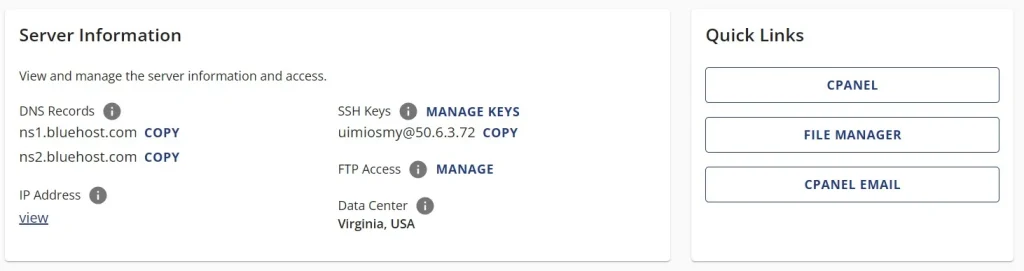
From this point simply click on “CPANEL EMAIL” and you’ll be able to setup any email for any domain you have added to your hosting account.
I suggest creating an email with something like your name at your website, hello at your website and so forth. Have a personal touch to it if possible as “info” or “support” is a bit corporaty and boring.
Step 2: Type the email handle you want
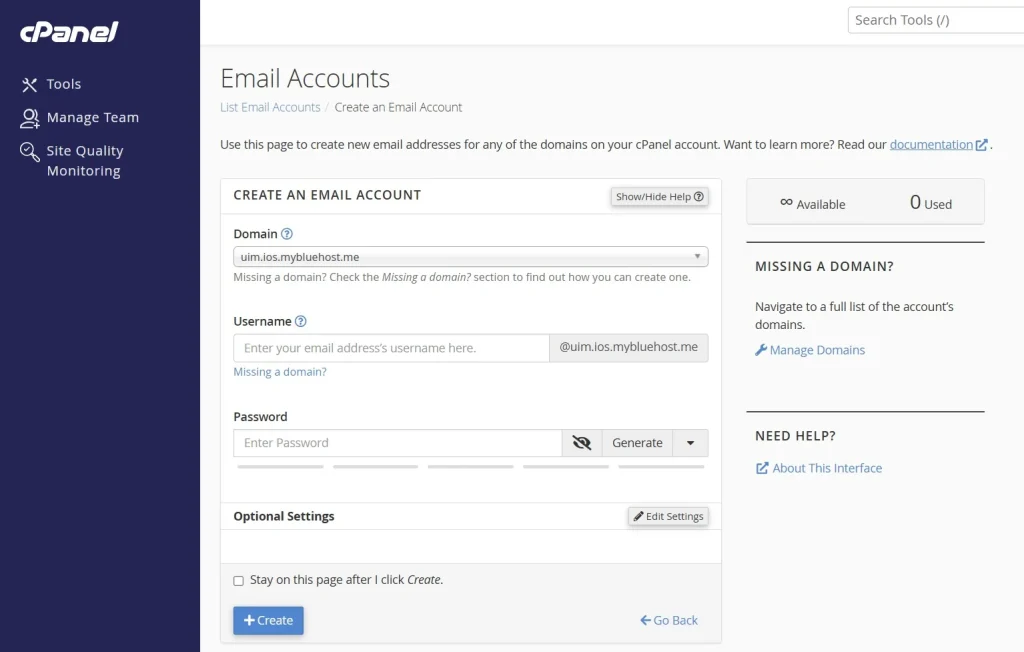
Once you click on “continue,” you’ll be looking at a CPanel dashboard to create an email. Simple set your username and password and that is it.
To check your email, you’ll need to log into your hosting account, then go to your CPanel email and log in using the password you just set.
Pros:
- This is the simplest way I know to get a professional email.
Cons:
- CPanel emails are quite limited with storage which is why most people end up getting dedicated email hosting or they use Gmail with their CPanel email as Gmail gives you 15 gb of storage.
How to use Gmail with your CPanel email
Gmail gives you 15 GB of storage so it’s a much better option than using a CPanel email alone.
To use Gmail with your Cpanel email you must setup an email forward from your professional email that you just created to a free Gmail account.
Then in your free Gmail account, you’ll need to setup a “reply as” to reply as your professional email.
Here’s how to do that:
Step 1: Create an email forward for the pro CPanel email you just made
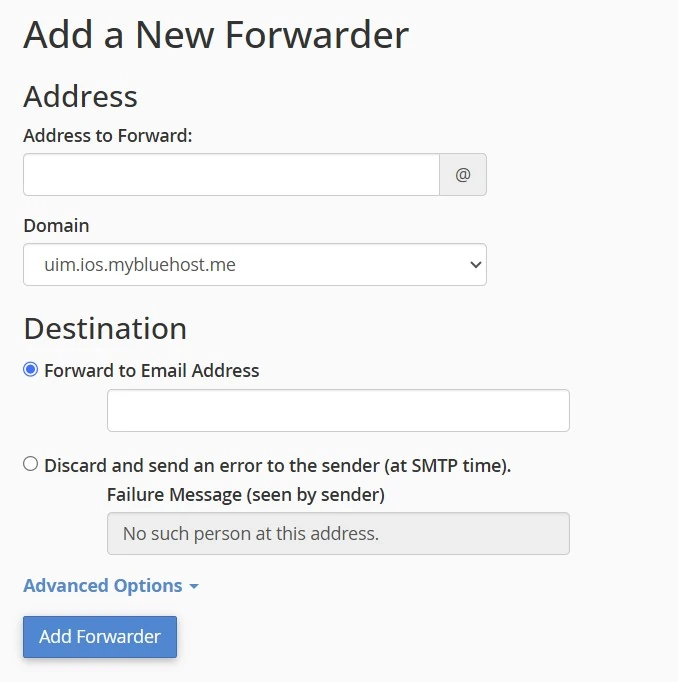
You can setup a forward of domain forward. Domain forward means all emails sent this domain are redirected where a forward is for a single email.
I suggest using a forward so direct emails from your CPanel email to your Gmail.
Step 2 – Set an alias in Gmail
You need to create an alias to “reply as.”
This sounds complicated but it’s quite simple. When you reply to emails that have been forwarded, the reply will come from the Gmail account (obviously).
But the issue is if someone emails “hello@example.com” and gets a reply from a random Gmail account, it looks weird
As such, you need to setup an alias to reply as.
Go into your advanced settings in Gmail by clicking on the gear icon and navigate to “accounts and import” then click on add another email address:

What you’re doing is that you’re verifying that you own the professional email you want to reply from. So once you click to add another email address, you’ll see a popup:

Put in the professional email you created. Change the name as needed as well. When you reply to emails forwarded to this free Gmail account, the reply will look like it came from this email address.
When you click on “next step” fill out the form as follows:

Now you’ll have to fill out a few pieces of information. It should auto populate the required fields, but if not you’ll need to verify this information in your shared hosting account.
Bluehost as a dedicated guide as to their SMTP settings. Your host will provide the same information.
- SMTP Server: This is your servers mail address. It’s usually mail.example.com.
- Username: This is the professional email you setup.
- Password: The password you created for your professional email (not the Gmail account mind you).
Step 3: Test it out and “reply as” your professional business email
The last step is to actually reply to emails from your professional email account. Now that you have added an alias, you need to make sure it’s selected when replying to emails.
You can choose to reply as the Gmail account or the alias you setup.
Get an email hosting account
The last way I want is to purchase dedicated email hosting.
This is the method you want to use once you’re getting a lot of emails, need more advanced tools and want more security and privacy than what a Gmail provides.
Functionally, this is a private email server. Once you purchase an email hosting account, you’ll have to setup a few things. First, you need to decide which of your domains you want to create an email hosting account for.
Setup a mailbox and the DNS settings
Once you signup for an email hosting account for a specific domain you’ll need to navigate to “advanced DNS” and set “private email” as the mail settings.
Next, simply manage the email for your domain. It’s an intuitive interface where you can add and delete mailboxes and check your email.
Please note that from now on, you’ll have to log into Namecheap to access your email. Alternatively, you can setup an email client like the Mail app on Windows or the IOS Mail app.
What to look for in an email host
As you’re shopping around you will want to look for are how much data you’re able to store for both email and media like images. You’ll also want to know how much adding additional mailboxes to your account costs.
My three favorite email hosting plans are from Namecheap, Dynadot and Google Workspace.
Namecheap – Best overall choice
With Namecheap, their starter plan is a low cost choice for those who just need a pro email with a good amount of storage.
You get 1 free mailbox (like “hello” at your website), 5 GB of email storage and 2 GB for files. For anyone starting out this is more than adequate. They do charge roughly $8 per year for each additional mailbox.
Namecheap
Low prices on domain names, low renewal rates, free WHOIS protection and good support.
I use Namecheap for all my domains and use them in my tutorial videos.
Dynadot
Dynadot provides 1 inbox totally for free. You don’t get any sort of advanced spam filters, backups or any guarantees, but it’s free.
Their email hosting plan which allow more advanced features an unlimited email address costs just $20 a year.
Google Workspace
Google Workspace is basically all of Google’s suite of services under a paid account. That means no ads, no sharing your data. You get Gmail with a custom domain, storage and a wide range of collaboration tools.
Conclusion
So that is it for this guide on how to create a professional business email for your brand.
I would start out with using a shared hosting account and doing a redirect to a Gmail account. Then when it makes sense, upgrade to a dedicated email hosting account.
Any questions or comments? Let me know via the contact page.
How I can help you. You're here, let's do this:
1. Website Review Your website may be clear and specific to you, but it may be really confusing to anyone who visits. That's where I come it, I'll give you actionalbe feedback to improve your site with my highly rated gig.2. My YouTube channel Helpful video tutorials showing you how to launch, grow and monetize your audience.


