From the desk of David Utke
Subj: Let’s sell low ticket products with Stripe (full YouTube tutorial here)
So you want to sell digital products with your website. Well you have a lot of different platform options for that. One fairly easy way is to setup a Stripe checkout page.
Stripe allows you to:
- Create checkout pages for digital products with a bump offer if you like.
- Accept credit card payments with ease.
- Make a payment link you can easily share via your website that directs the end user to the checkout page you made.
This is ideal if you’re looking to sell low ticket products. All you need to do is take care of the sales page and the deliverable.
What We’re Building
I’m going to show you how to create and customize a Stripe checkout page, add a product, and how just to sell something via Stripe.

What’s great about Stripe as well is you can also include a bump offer on the checkout page if you like.
Step 1: Create Your Stripe Account
First, navigate to stripe.com.
There’s no pricing with Stripe. It’s completely free to sign up and use it. To create your account is pretty simple.
You can either get started by entering in your email address and clicking “start now,” or you can click on the “sign in” button up top there. And then once you’re over here, you can just click on “create an account” if you’re new to Stripe.
Then you’ll be directed to this page to create your Stripe account. Simply follow the onscreen instructions to create your account.
Step 2: Add Products
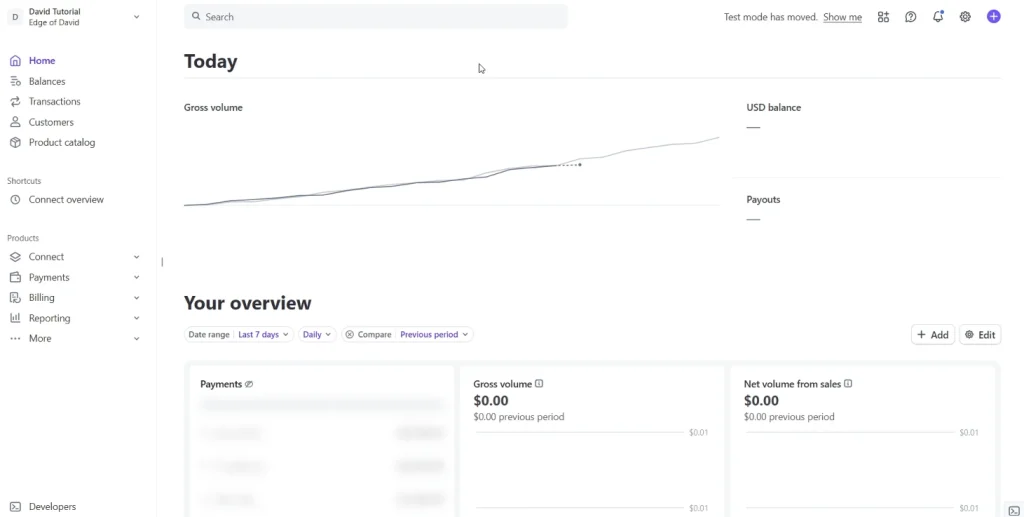
Once you go through the process of signing up to Stripe and creating your account, you’ll be looking at the dashboard.

To add products click on your product catalog in the left-hand sidebar.
This will show you your product catalog, all the different products you’re selling via your Stripe account.
To get started creating your own product just click on the “create product” button.
Product Setup

The only things you need to do is you need to add in a name of the product obviously and then a description. That’s optional, but that appears at the checkout to customers, so you do want to add in a quick little product description.
You can also upload an image of the product. It does need to be under 2 megabytes. So, it’s not a huge image, but it’s not a small image either. I definitely recommend using a webp format if possible.
Setting “recurring” and “one off” pricing
You can set the pricing to be recurring. Be it be daily, weekly, monthly, yearly, every 3 months, whatever. Or you can have it be a one time payment which ideal for most low ticket digital products.
More pricing options
You’ll notice right at the bottom it says “more pricing options.”
If you click on that, you have your “choose your pricing model.” So it’s pretty feature-rich. You can have a flat rate which offers a fixed price for a single unit package seat whatever digital download, or you can have package pricing or “customer chooses the price.”
Step 3: Create Payment Links
Now that we have one product in our product catalog, well, how do we offer this for sale? How exactly do people give us money to get this thing?
Well, to do that, it’s very simple. You need to create a payment link.
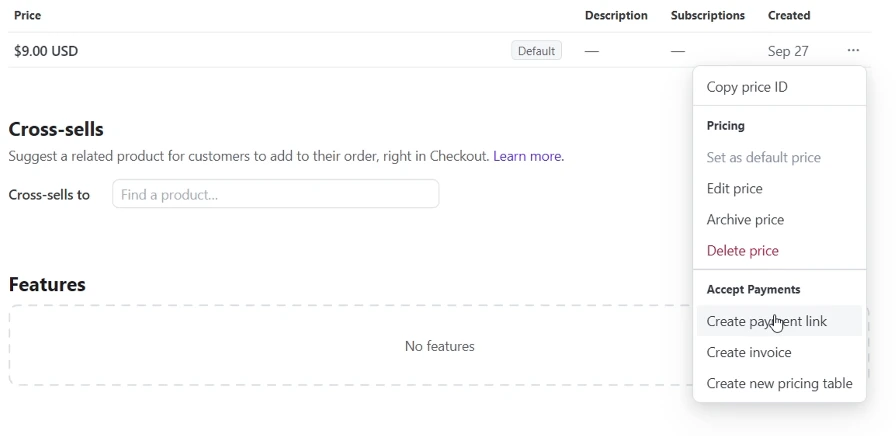
So, go down to your product and click on it. This will open up your product page. And you want to click on the little three dots right there.

You want to navigate down here to where it says “create payments link.” Go ahead and click on that.
Now, it’s going to preview what the page looks like. If you’re just good to go, this looks nice, then you can click on “create link.” And that is it. It’s as simple as that.

Make sure everything looks correct like the title of the product, the price point, that little description over there, the image that we added in and so forth
Additional options
You can collect tax automatically, collect customers’ addresses, require customers provide a phone number, limit the number of payments and things like that.
If you click over here for advanced options, you can add in custom fields, allow promotional codes, allow businesses, customers to provide their tax ID, save payments, require customers to accept your terms of service, and so forth.
You’ll also see “pay” as a call to action. So, if you want to change the call to action to something like donate, book, pay you can do so here.
“Pay” is the best if you’re selling a product with a one-time payment.
After Payment Settings
Then you have your “after payment” tab. So this just covers like what happens after they submit payment. What is your end user going to be looking at?
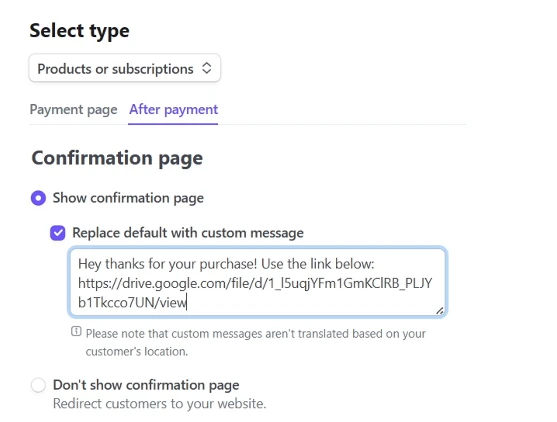
So over here you have “thank you for your payment.” You can change the confirmation page as well as replace the default text with a custom message.
You can also select “don’t show confirmation page” which allows you to redirect customers to a page of your choosing. This is ideal as you can provide a download link on this page or direct them to directly to where they can download the item the bought.
Step 4: Adding Cross-Sells (Bump Offers)
Adding in cross-sales to your product pages or bump offers as I like to call them is very easy with Stripe checkout.
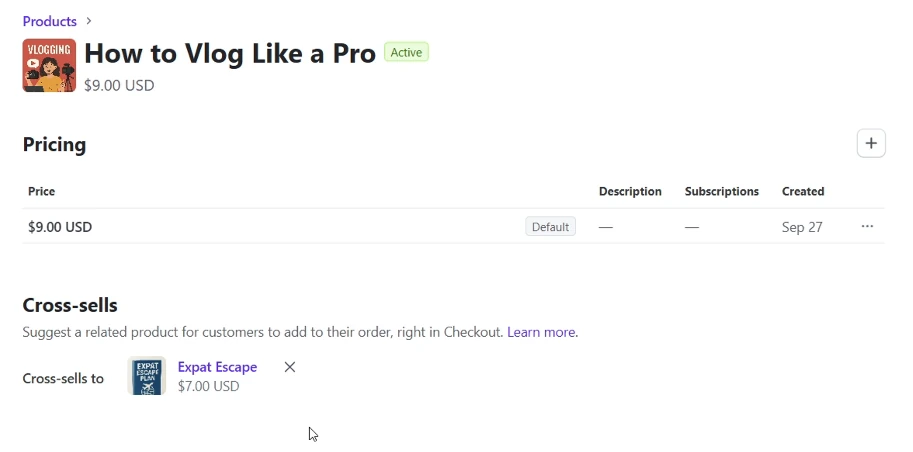
This cross-sell product should be complimentary to your main thing. So for example, my example product is “how to vlog like a pro.” A complimentary product should be like “get 50 ChatGPT prompts for creating compelling video titles.”
Click on the product catalog link again and then click on “cross-sells” to add your product.

You can add a product you already have in your Stripe account as a cross sell or add in a completely new product.
Just like that, you now have added in a one click upsell to help increases the cart value.
Step 5: Create a Sales Page
Once you have your payment links all set up with their respective bump offers, it’s time to create a sales page for your product because you don’t want to be directing people directly to the checkout page. You need to create a sales page to well sell people on why they should buy the product.
You can create a sales page with any number of platforms, everything from Wix, Squarespace, Lead Pages, WordPress or Ghost.

Make sure to add big buttons to your sales page and have those buttons direct the end visitor to your checkout page using the Stripe payment link.
Step 6: Embed Buy Button (Optional)

Another useful feature that Stripe provides on the back end is this buy button functionality right there under your payment link page.
Navigate to your payment links, open up the page again, then click on the “buy button” right there, and you’ll have some HTML code that you can copy and paste into your website. Use the HTML block of whatever website builder you’re using.
If you scroll down, you’ll see customization options.
You can show it as a card or you can change it to a button. There are also styling options so you can change the background color, the button color, the font, border style, all that good stuff you can change to your liking.
Go ahead and click on “copy code.” Navigate back to your website builder, click on the HTML block, copy and paste that in, done!
So it shows the product, shows the price point, what the product is called, as well as a buy button with supported payment methods underneath.
Step 7: How to Deliver the Produc
We want to deliver the product that the person buys automatically without us having to do anything because well we don’t want this to be a manual process where we have to email people manually when they buy something from us.
Method 1: Google Drive Link
The easiest way possible is to use Google Drive. You can upload your ebook or whatever digital download you’re selling to Google Drive and then provide a Google Drive link.
Navigate back over to payment links and now we need to edit this again. Click over here to edit and it takes us back to the page. With the payment page we want to click on “after payment” right there.
We now have “show confirmation page replace default with a custom message.” You can say something like “thank you for your purchase use the link below” and link to the location on Google Drive.

Method 2: Direct Redirect
The other way is to click on “don’t show a confirmation page” and redirect the visitor. You can either:
A) Create a custom page. So you could have it be like mywebsite.com/thanks-for-buying. Here’s the link to purchase the thing or or sorry purchase but to download the thing that you just bought.
B) Just redirect to the Google Drive location so they can download immediately.
Step 8: Customize Email Confirmations

You do want to send a customer email as well automatically when someone buys so they get an email confirmation that they successfully purchased the product and whatnot.
So with that within Stripe, find “customer emails” and toggle it on. You can then navigate to your branding tab to customize the look and feel of the emails that go out.
Step 9: Deliver Product and Cross-Sell with Zapier (Advanced)
Finally, how do you deliver both products if the user takes you up on your bump offer cross-sell type thing?
As you saw on the back of your Stripe account, it’s pretty easy to set up a payment link and a link to your Google Drive where people can download an ebook, create a page on your site where people can download said book or whatever digital download you’re selling, that type of thing. Very easy.
But what if they take you up on this cross sell?
Within Stripe, you can only have one link where you can direct people to. So, that’s not going to work because we need to have two different links. We need one link if the person just buys this and then we have to have another link if the person buys this and this.
Well, in order to set that up, you do need to take a look at Zapier. So, it might be a little bit technical for some people, but Zapier allows you to automate the delivery of your ebooks on the back end.
Setting Up Zapier

Log into Zapier. You want to click over here to click on “create.” Then, you want to click over here for “zaps.” And then you want to create a zap. Click over here, click on that “automated workflows.”
What’s really nice with Zapier is that you have this co-pilot thing up top here. So AI, so you have any type of questions when you’re setting things up, you can ask the question over here and the co-pilot will literally tell you like this is what you need to do and what you need to set up.
I went ahead actually and already kind of built this out broadly speaking like how you need to set this up:
Step 1: Set the Trigger
Number one is that you want to have the Stripe checkout session complete to be the trigger right there. Click on that and then you want to find Stripe. Just type in Stripe. There we go. Click on that.
And then select the event. Choose the event. You want to click on “Checkout session completes” right there. That means that someone has bought something from Stripe.
Now, of course, you need to link your Stripe account to Zapier in order for this to work. You have to click on the “add account.” Connect Stripe account. You click on “sign in.” Then you go through the onscreen process to link your Stripe account to your Zapier account.
Step 2: Add Paths
Now, you need to add in a path. We’ll click over here for “paths.” And then you just need to look for paths. Paths are right here. And then click on that. Then “add a path.” And now we have A and B.
Let’s click on the path conditions. And then “custom rules only continue if.” So you have a bunch of different conditions that you can kind of test to see what works.
I usually like to use like “text contains.” So what would this text contain when the user checks out? So it’ll contain the name of the product. So the name of the product would be like this, like “vlog like a pro.” So text contains “vlog like a pro.” There you go. And then they go down path A.
Then path B, text contains “vlog like a pro” and “expat escape.” You can put that in over here for path B. Text contains that “vlog escape expat.” There you go. Simple as that.
Step 3: Add Google Drive Action
And then what happens next? So you navigate down here to Google Drive and then within Google Drive. Click over here for the action right there. You just click on Google Drive. There you go.
Now again, you have a bunch of different events. The thing that you want is “find a file.” And then you just click on the “connect Google Drive sign in” and then you can select the file that you want to deliver to the end visitor. When they buy they get this file and then if it contains this kind of text then they go down path B and they get this file.
Organizing Google Drive Files
Now let’s jump over here to our Google Drive. Create a Google Drive link for the product with no cross sell and create a folder with both the cross sell and the main product inside.
That way you have two different URL’s for each path.
Final Thoughts
This is a great way to sell simple digital products without buying any software that charges you a monthly fee or takes a big transaction fee.
Long term though I do suggest the two following options:
ThriveCart
ThriveCart allows you to have a high converting checkout page with a bump offer, and it only costs a one-time fee. So, you can build out your nice long sales page, have a button, the user clicks a button, then they’re directed to a ThriveCart checkout page with a bump offer.
Thinkific
Thinkific allows you to have video courses, digital products as well as coaching. You create your own course website, each course has it’s own sales page that directs the end user to a solid checkout page. Thinkific takes care of the video hosting for you as well.
Any questions? Let me know.
-David
How I can help you. You're here, let's do this:
1. Website Review Your website may be clear and specific to you, but it may be really confusing to anyone who visits. That's where I come it, I'll give you actionalbe feedback to improve your site with my highly rated gig.2. My YouTube channel Helpful video tutorials showing you how to launch, grow and monetize your audience.